
Introduction:
Primarily, an early pancreatic ultrasound can greatly aid in both the timely diagnosis and subsequent treatment of various pancreatic diseases. Specifically, this non-invasive procedure uses high-frequency sound waves to create detailed internal images. Furthermore, these real-time images help clinicians determine if there are any underlying structural abnormalities. For example, it can effectively detect acute inflammation of the pancreas, developing cyst masses, or subtle changes in the overall characteristics of the pancreas tissue.
Here is a complete guide to pancreatic ultrasound, patient preparations, anatomy and interpretation.
What is a Pancreatic Ultrasound?
Primarily, A pancreas ultrasonography is primarily a specialized diagnostic test that aids medical professionals in seeing the pancreas and evaluating its anatomical features. Specifically, this procedure allows sonographers to evaluate the size, shape, and overall parenchyma of the organ.
Normal Appearance on Ultrasound
Furthermore, a normal adult pancreas appears completely homogeneous and exhibits smooth margins. In addition, its parenchymal appearness is typically equal or more then liver.
in order to do complete examination pancrease is scanned in both planes ( transverse and logitudinally ),its allow sonographers to make accurate diagnosis.
.

When is pancreatic ultrasound recommended?
A pancreatic ultrasound is primarily a vital tool for medical professionals who need to assess the pancreas for structural anomalies. Additionally, this scan is often recommended by clinicians to closely monitor a known pancreatic disease over time or to look into acute symptoms. As a result, this imaging technique is quite useful for monitoring organ changes. For instance, in the following circumstances, a pancreatic ultrasonography might be strongly advised:
- Abdominal pain ( radiate toward back )
- Suspected acute or chronic pancreatitis
- Yellowing of the eyes and skin (jaundice)
- Abnormal blood test (amylase, lipase)
- Unexplained weight loss
- Gallstones suspected to have involvement of the pancreas
How to prepare patients for pancreatic ultrasound?
Undoubtedly, patient preparation is essential for accurate scanning. Consequently,closely adhering to these set parameters can greatly improve the final diagnostic accuracy as well as the overall quality of the image. . Furthermore, proper preparation minimizes common imaging interference like bowel gas to provide a much clearer view of pancreatic tissue.
| Preparation Recommendation |
| Food No food or drinks for 6–8 hours prior to the scan |
| Water Small sips only, as needed for medications |
| Foods that produce gas furthermore Avoid for 24 hours prior to the exam. |
| Smoking Avoid for several hours before the scan |
| Medications Keep essential medicines unless advised otherwise |
| Clothing wear loose comfortable clothing |
| Medical history: Describe relevant medical conditions to the health provider |
Scanning techniques for pancreatic ultrasound
Patient positioning and probe manipulation are important, as bowel gas may obscure the gland.
1. Patient Position
- Start in the supine position.
- Furthermore, Taking a deep breath in might help to move the pancreas down below the ribs to get a better image.
2. Transducer Selection
- Most adults will require a 2–5 MHz curvilinear transducer.
- Alternatively, a linear transducer with a frequency of 5–9 MHz could be highly helpful when scanning thin patients. Furthermore, this specific probe provides excellent resolution when examining superficial pancreatic lesions near the surface
3. Scanning Planes
Furthermore, to ensure a complete examination and evaluation and alternatively the pancreas in both planes
- Transverse (axial) plane
- Longitudinal (sagittal/oblique) plane
Examine the head, neck, body and tail systematically, evaluating the surrounding vascular landmarks.
Sonographic anatomy of pancreas:
Primarily, the pancreas is a retroperitoneal gland in the upper abdomen extending from the duodenum to the splenic hilum. Specifically, a normal adult pancreas appears completely homogeneous and exhibits smooth margins. Furthermore, its tissue texture is typically equal to or slightly more echogenic than that of the liver on an ultrasound scan. The sonographer must carefully scan over these typical features to guarantee a thorough inspection and assessment of the pancreas in both planes. As a result, this careful scanning method enables medical professionals to precisely detect any underlying pathology.
Pancreatic Head
Primarily, the head of the pancreas rests securely within the C-loop of the duodenum. Furthermore, it forms the largest part of the entire pancreas and is located anterior to the inferior vena cava (IVC). Specifically, the common bile duct typically runs directly through or behind the head of the pancreas. Consequently, this vital structure can be clearly visualized and evaluated during a standard pancreatic ultrasound examination
Pancreatic Neck
The neck is a short part that joins the head and body. It is immediately anterior to the portal vein confluence, the point at which the superior mesenteric vein (SMV) merges with the splenic vein to form the portal vein. Nevertheless, this is a vascular landmark that is important for determining the pancreatic neck.

Pancreatic Body
The body is elongated and is directed towards the left side of the abdomen. It is located in front of the aorta, superior mesenteric artery (SMA), and splenic vein. These vessels are good landmarks on ultrasound for locating the pancreatic body.
Pancreatic Tail
The tail is the narrowest part of the pancreas and points towards the splenic hilum. It is located close to the spleen and upper pole of the left kidney. Overlying bowel gas is the most problematic aspect to visualise and is typically the tail.
Main Pancreatic Duct
The main pancreatic duct is located in the middle of the pancreas. It is seen in healthy adults as a thin anechoic tubular structure and is usually 2-3 mm or less in diameter.
Normal sonographic characteristics of pancreas:
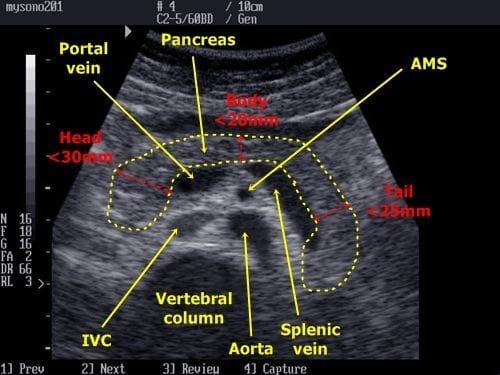
Sonographic appearance is following :
- Homogeneous, fine echotexture
- Smooth, well-defined margins
- Isoechoic to slightly hyperechoic compared to the liver
- Normal size and anatomical form.
Normal Pancreatic Measurements
| Structure | Normal Measurement |
| Pancreatic Head | 2.5–3.5 cm |
| Pancreatic Neck | 1.5–2.5 cm |
| Pancreatic Body | 1.5–2.5 cm |
| Pancreatic Tail | 2.0–3.0 cm |
| Main Pancreatic Duct | < 2 – 3 mm |
Frequently Asked Questions (FAQs)
1. Is there any fasting required prior to a pancreatic ultrasound?
Yes, 6–8 hours of fasting do help to minimise the bowel gas and enhance image quality.
2- Does a pancreatic ultrasound take about 10 minutes?
The exam typically lasts for 15-30 minutes.
3. Does an ultrasound of the pancreas hurt?
No, it is a safe and painless procedure, and there is no radiation exposure.
4. Is pancreatic cancer detectable using ultrasound?
Ultrasound may help detect suspicious masses in the pancreas, but further tests such as CT or MRI scans or biopsy may be necessary.
5. Is a pancreatic ultrasound safe during pregnancy?
Yes, it’s non-invasive and safe during pregnancy


2 Comments.